Subnautica 2 BioMods Unlock Guide: Active, Passive, and Scan Routes

BioMods are genetic upgrades you install at a Biolab. They borrow traits from native fauna and change how you move, gather resources, survive hunger and thirst, and handle predators. This guide is based on Lucky Ghost's community walkthrough and cross-checked against SN2 Wiki's Genome database for official names and scan requirements.
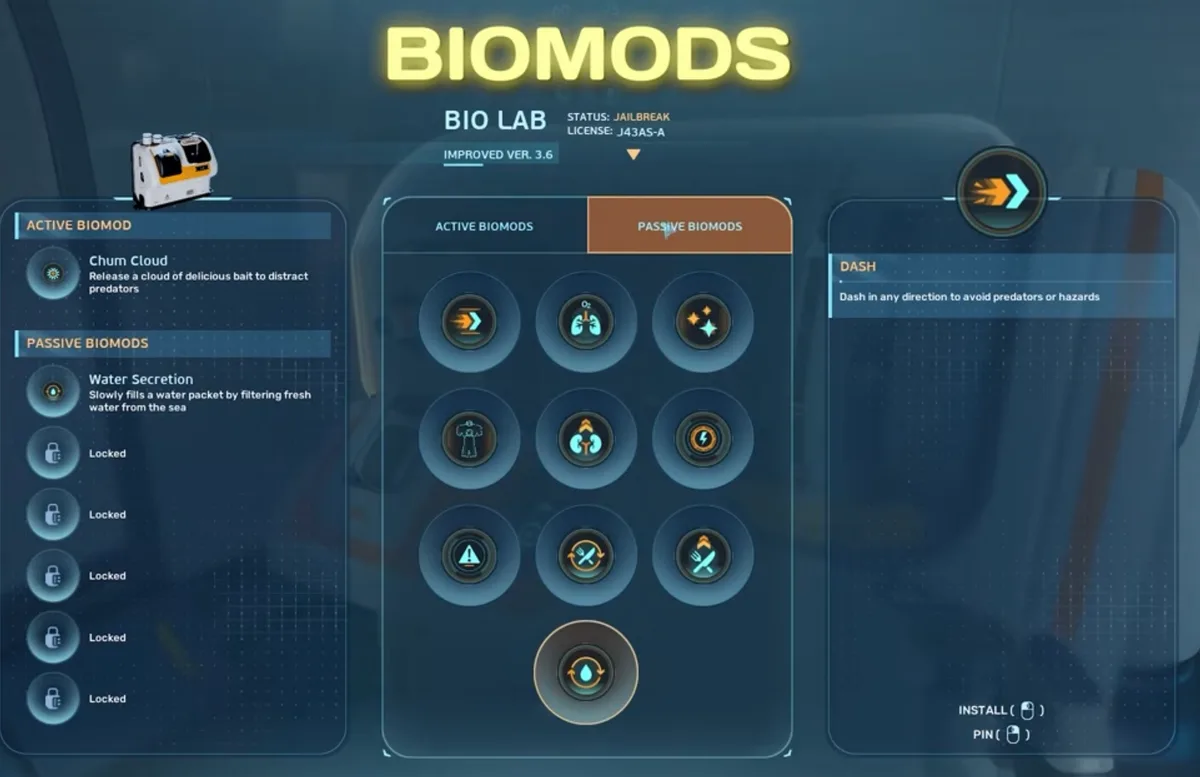
During Early Access you can equip one Active BioMod (triggered manually; default key Shift on PC) and one Passive BioMod (always on). More slots may arrive in future updates.
Bio Scanner: the unlock gate for almost everything
Before most BioMods appear, you need the Bio Scanner—an attachment for your regular Scanner. When equipped, a green glow shows at the front of the tool while aiming at scannable targets.
| Step | What to do |
|---|---|
| Find parts | Degraded Bio Scanner components lie on the ground in the late-game / endgame zone (not in the starter reef). |
| Craft | Install the upgrade at a Modification Station once you have the blueprint. |
| Scan correctly | Scans with the standard Scanner only give creature data; you must re-scan donors with the Bio Scanner to unlock BioMods at the Biolab. |
Until you have this tool, exploration scans are informational only—they do not register BioMod unlocks.
Starter BioMods (first Biolab, no scans)
Interact with the first Bio Facility / Biolab beside your Life Pod to receive four mods immediately:
| Slot | BioMod | Effect |
|---|---|---|
| Active | Dash | Short burst dash in your movement direction; cooldown shown in the HUD. |
| Active | Pathfinder | Leaves a trail of yellow orbs—ideal for caves, wrecks, and multi-room salvage. |
| Passive | Sea Skimmer | Near double swim speed when hugging the seabed; best early-game mobility before vehicles. |
| Passive | Oxygen Control | Oxygen still drains ~1 per second while moving, but consumption slows sharply when you stand completely still (useful for deep scanning). |
Active BioMods (scan to unlock)
| BioMod | Effect | Required scan(s) | Location tips |
|---|---|---|---|
| Sonic Echo | Large pulse highlights collectible minerals (copper, titanium, etc.). | Collector Leviathan | Apex predator in the massive trench between starter and late-game zones. Safer approach: descend from directly above for the scan. |
| Electric Discharge | 800-volt shock that stuns/deters medium and large predators. | Electric Geordie | Deep water beyond the Alien Ruins (~1,241 m from start); build a second base in that region first. |
| Chum Cloud | Fires bait that pulls aggressive predators away for 5–10 seconds. | Toxic Sponge and Houndgar | Toxic Sponge in starter-area caves; Houndgar near Alien Ruins in the late-game zone. |
Passive BioMods (scan to unlock)
| BioMod | Effect | Required scan(s) | Location tips |
|---|---|---|---|
| Bioluminescence | Body and hands glow in the dark; creature reactions vary. | Electric Geordie + Sandspear | Geordie as above; Sandspear in starter sandy zones—ambush predator, scan quickly when it lunges. |
| Camouflage | Full invisibility while motionless (ethereal hands); works even vs Collector Leviathan sonar in testing. | Bullethead | Walls of the massive canyon toward the giant tree/coral structure (Giga Squid territory) and sporadically near Alien Ruins. |
| Water Retention | Doubles water from all consumable sources (e.g. +40 item → +80). | Coral Crab | ~380 m east of Life Pod in a hydrothermal transition zone; exit vehicle to wake the crab. Also drops feces usable for food crafting. |
| Homing Sense | UI lightning icon marks nearby powered bases (great for hidden blueprint rooms). | Hammerhead + Surge Jelly | Hammerhead east of Life Pod; example Surge Jelly ~170 m SSE of pod. |
| Threat Sense | Beeping alert when hostile predators are nearby. | Hoverthorn | Small catchable fish on the north edge of late-game waters past the canyon, near the giant structure. |
| Dermal Garden | Every 3 minutes, adds an Algae Block (+5 food) to inventory (stack cap 30). Net: hunger drops ~1/20s (9 per 3 min) vs +5 food every 3 min ≈ ~half hunger drain. | Needler Mango | Deep trenches in endgame zone; highly aggressive—bring a repair tool for your vehicle. |
| Slow Metabolism | Hunger tick averages ~1 per 40s instead of 1 per 20s—similar efficiency to Dermal Garden; choose passive slowdown vs emergency food stacks. | Nibbler Mango | Around the Angel Comb POI on your map—blue/yellow shark-like fauna. |
| Water Secretion | Every 3 minutes, adds a Filtered Water Packet (+30 water); stack cap 30. | Water Slug | Extremely common—starter shallows and many late-game floors. |
Which BioMods to prioritize
| Phase | Suggested picks | Why |
|---|---|---|
| First hours | Sea Skimmer (passive) + Pathfinder or Dash (active) | Faster looting and safer cave exits before the Tadpole. |
| Resource grind | Sonic Echo | Mineral highlighting saves enormous search time—plan a careful Collector Leviathan scan run. |
| Predator pressure | Electric Discharge or Chum Cloud | Hard CC vs distraction bait—pick based on your playstyle. |
| Survival maintenance | Dermal Garden vs Slow Metabolism vs Water Secretion | Roughly comparable food/hydration value; Water Secretion is easiest to unlock (Water Slug everywhere). |
| Exploration / stealth | Camouflage + Homing Sense | Stand-still stealth and finding powered installations for blueprints. |
Early Access limitations
- Only 1 active + 1 passive equipped at once today.
- Most scan-gated mods unlock late because the Bio Scanner arrives near endgame—many become more valuable when additional slots ship in future content.
- Positive/negative trait slots exist in game data but are not all shipped yet; see the Genome database for the live list and genome costs.
Video source
Community reference: Lucky Ghost — All BioMods and How To Unlock Each One in Subnautica 2 (~19 min, Early Access). Timestamps in the embedded player match his chapter markers (Dash/Pathfinder at 0:24, Sonic Echo at 1:40, etc.).
Next Step: Plan The Build Sequence
If this article is guiding your next base expansion, start in the Building Database to confirm modules and recipes, break material pressure in the Crafting Planner, then verify each ingredient in the Item Database.
Related Databases And Tools
Guide articles are strongest when they connect directly to the underlying databases, planning tools, and map routes they reference.
Use items and buildings for recipe context, creatures and adaptations for scan and threat checks, blueprints and PDA for unlock/lore chains, then validate route execution in the interactive map and Crafting Planner.
Items
Track raw resources, crafted materials, and progression components.
Buildings
Review base pieces, habitat modules, and construction recipes.
Creatures
Check habitat, threat level, and traversal impact before exploring.
Vehicles
Tadpole core module, chassis options, and Vehicle Bay recipes.
Adaptations & Biomods
Bioscans, biomod slots, and story adaptations.
Blueprints
Unlock requirements and recipe-linked blueprint events.
PDA
Official databank entries, scan notes, and story logs.
Crafting Planner
Break recipes into raw materials, sub-components, and build order.
Interactive Map
Plan routes around resources, cave entrances, and danger zones.